Woven Edges

I have been exploring ruffled edges for a decade now using a variety of pleating, folding, fretting, and gathering techniques. And while I have further experimented with woven fillets, I sadly do not possess the skill to actually weave frilled edges.

Recently, my friend Drifa in Rauða who is a Viking Age reenactor, decided to take on some experimental weaving that has been of great interest to me. We both began in the SCA in 2005 and actually live quite close to each other. Our paths and interests, however, have diverged as we have explored different cultures and time periods.

I was very excited when Drifa contacted me to let me know she was going to experiment in creating woven edges inspired by the Report of Textiles from Burgos Cathedral. The work she has done over the last few months, in both silk and linen, has been inspiring. I’ve learned more about these textiles and it has been a joy to collaborate in discussions with her. This last weekend, I even had the opportunity to experiment with wearing her first linen ruffled veil (pictured above-left). #LifeGoals I would encourage all of my fellow ruffled veil enthusiasts to check out her blog posts. You won’t be sorry.

Silk Woven Frills

Linen Frilled Veil

The 10 Hour Ruffled Veil

For a long time now, I’ve been thinking that it would be wonderful to see more women in An Tir wearing frilled veils. People always comment about how much they like them, but no one thinks they have the time to make one. And in all honesty, I can understand why some are reluctant. I have made five different ruffled veils now, and most of them took between 75-100 hours to make. Of course, each of those required a fair amount of research and experimentation, and were made using medieval techniques.

What if I could use a few simple short cuts to cut down on the time involved in making a frilled veil? Could I make a ‘department store’ version of the ‘couture’ veil? Could a ruffled veil be made in a single day? I was going to find out…

Supplies needed for this Quick Ruffled Veil:

  1. Machine hemmed  (rolled serge is perfect) oval veil
  2. Rotary cutter
  3. Bias tape maker (just the simple style)
  4. ‘Disappearing’ fabric marker

I started by pressing a fairly long plain oval veil.

I decided to start by using something that I already owned, an oval veil that I had purchased online years ago from Revival Clothing(http://www.revivalclothing.com/linenrectangularandovalveils.aspx). This was actually my very first veil. It was machined hemmed with a serger rolled hem. Because of this, I no longer really liked to wear the veil, preferring to wear veils that have been hand hemmed. However, this made it a perfect place to start for my Quick & Easy Ruffled Veil.

Next, the veil was folded in half and cut into two half ovals.

The front edge of the half oval was pressed for hemming.

After the unfinished front edge of the veil was pressed, I did a standard rolled hem around the entire semi-oval veil. This was a fairly quick and simple process, as the curved portion already had a serger finished edge. I find that hemming is always quicker when fabric has been serged first.

The remaining half of the veil was cut into two inch strips.

Fabric strips are run through a bias tape maker and then pressed.

The next step was to cut the remaining half of the original oval veil into two inch strips using a quick rotary cutter. I then ran these strips through a bias-tape maker, pressing the strips flat with an iron. After these strips were pressed into 1 inch bias tape, I then folded them in half and pressed them flat again.

Double folded & pressed veil bias tape.

Double folded & pressed veil bias tape.

When the bias tape was completely pressed, I used a simple running stitch to sew the two sides together. I did this by hand, but it could be done using a sewing machine, if you are short on time. Then I used a ‘disappearing fabric marker’ to mark every half inch on the veil tape. By marking with a pen instead of using straight pins, a significant amount of time was saved. After that, I used the same fabric marker to place small marks every quarter inch on the front edge of the hemmed veil. By stitching the veil tape to the veil at a 2:1 ratio, a nice ruffle is created.

The veil strip is hand sewn with a running stitch.

The veil strip is hand sewn with a running stitch.

Temporary marks are placed on the veil tape and on the edge of the veil.

Temporary marks are placed on the veil tape and on the edge of the veil.

Finally, the veil strip is sewn to the front edge of the veil with a whip stitch. I would line up the marked dots and anchor with two whip stitches. Then I would bend the veil tape the opposite direction and do the same thing at the next mark. After the veil strip is permanently attached, I simply sprayed some water on the edge of the veil and all of the blue marks just disappeared.

Overall, I am extremely pleased with this veil. The entire process took me about 10 hours to complete. I made mine on a Saturday, but I think that this project could easily be completed in a week if you spent an hour or two working on it each night. That is a realistic time commitment for most medieval veil enthusiasts. 🙂

A 2:1 ratio of veil tape to veil edge creates a lovely ruffle.

A 2:1 ratio of veil tape to veil edge creates a lovely ruffle.

The finished veil at a Yule Feast in An Tir.

The finished veil at a Yule Feast in An Tir.

Twelfth Night is merely a month away for many of us, but this is still plenty of time to create a simple and stunning ruffled veil.

~Cristiana

Veiling a Queen

Last spring, after the Kingdom of An Tir’s A&S championship, Queen Gwyneth Gower asked if I would be willing to make a frilled veil for her. I could not pass up the opportunity to veil a beautiful 14th century Queen who happened to also be a dear friend of mine.

And so the search began…how to veil a Queen?

Képes Krónika 1358 - Kingdom of Hungary

Képes Krónika 1358 – Kingdom of Hungary

Queen of Denmark Euphemia of Pomerania

Queen Esther from Tirsted Church

After gathering several images of Royal ruffles, I began to consider the best style of frilled veil for Queen Gwyneth. I decided to create a long veil that could be folded on itself three times to match many of the brasses that appear to have three layers of ruffles. I consulted with Maitresse Elisabeth de Besancon, who had created a longer 15th century ruffled veil in this style.

From Burgos Cathedral
Foto: Marianne Vedeler

With much consideration, I set out to construct Queen Gwyneth’s veil at three times her shoulder to shoulder measurement with a front and back ruffle. This would be folded to create a layered ruffle look. After reading a report on a 14th Century Queen’s ruffled veil find in Prague that had included some embellishment, I made the decision to add a pearl embellisment to Queen  Gwyneth’s veil.

~ Cristiana

The outer edge of the large rectangle was hemmed on all sides.

A long veil strip was hemmed for the ruffle.

Completed veil strip.

The edge strip is ruffled as it is sewn to the veil.

Ruffled Edge

Pearls were added to the Queen’s veil.

Queen Gwyneth wears the ruffled veil at July Coronation over a ruffled cap made by Maitresse Elisabeth de Besancon.

The Fretwork Veil (Part 2)

 When thinking about how to design this fretted veil, the thing I struggled with the most was always shape. How many layers were the frets actually attached to? Was it one long veil folded back and forth? If so, wouldn’t the frets collapse as they were bent around at the folds? In the end, I designed one row of frets and folded the veil linen in half, with a center seam. It was the images below, which can be located at http://www.larsdatter.com/frilled-veils.htm, that gave me a better idea of how the sides of a frilled veil might hang and look.


I entered this veil as a single entry in An Tir’s Kingdom A&S competition in March. Despite months of previous work, I was still up much of the night with final preparations. Thank goodness for a couple of my dearest friends who stayed up to help me and keep me going. 🙂

~ Cristiana


The Fretwork Veil


In the spring of 2005, I attended my first event in the Society of Creative Anachronism (SCA), an Ithra session of classes. I was nervous, excited, and absolutely convinced that I could not set foot at an event without a hat on my head.  And so I made a hat, which I loved. It was the first garment I constructed on my own. Later that spring, I came to an important realization while attending my second event, Glymm Mere’s Mayfair, a revelation that would influence my entire SCA experience.  What a fourteenth century English woman really needs is a veil…

…and the rest is history.

“Images of frilled veils are extensive and span from the middle of the thirteenth century until well into the fifteenth century (Newton & Giza, 1983). These veils start out with soft edges and with each passing decade become increasingly more elaborate in presentation and more numerous in layers.


Known by many names, (frilled, ruffled, crimped, goffered, kruseler, fluted, wrinkled, fretworked) veils are depicted in artwork, the stained glass windows of churches, stone statuary, and even woven tapestries. However, it is the burial tomb effigies and brass etchings, in their abundance, that offer the best look at the unique women’s head coverings of the late fourteenth century.


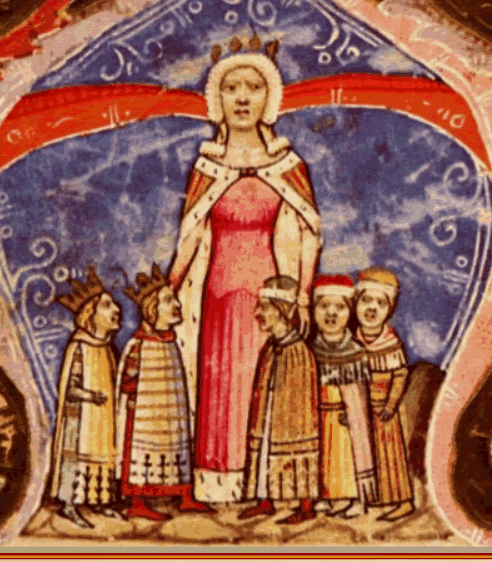
Catherine de Beauchamp’s Fretwork Veil
© Moriarty

I have long been drawn to the exquisite burial tomb of Catherine de Beauchamp. She wears a detailed and complex fretwork veil that is a thing of beauty. Born in 1314, Catherine Mortimer was buried as a Countess along-side her husband Thomas de Beauchamp, 11th Earl of Warwick after their deaths in 1369. Her effigy wears a spectacular headdress which consists of two veils. A simple (likely woven) frilled veil sits over the top of an elaborate 12-layer fretwork veil (Sturtewagen, 2006/2007). The fretwork extends to the back of the veil, as well.

Avena Foljambe
© Margaret Scott


While researching my previous veil projects, I developed a fascination with the idea of creating a fretwork veil. Catherine de Beauchamp’s veil became my inspiration. Avena Foljambe’s effigy headdress, described by Margaret Scott (1986) as a thick combination of fluted veils stylized into a fretwork, is another beautiful example of this medieval English style.

The veil, itself, is a rectangle long enough to be doubled. This allows sufficient length to fold it in half, sewing a seam in the center on the underside of the veil. My previous frilled veils were both semi-oval in shape, which was likely less common than a rectangular veil in the fourteenth century. For this reason, I was excited to try this new shape.

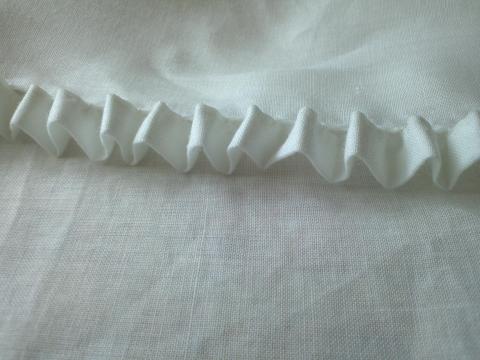
My early experiments indicated that it would be beneficial to slightly pleat the fretwork strips in order to increase the fullness of the fabric and allow the frets to open more easily when starched.

My initial plan was to fold the fretwork strips in half, with the crisp fold facing towards the front to provide a very neat appearance. However, upon examination of the pleating in the extant ruffs featured in Janet Arnold’s Patterns of fashion 4 (2008), it was clear that the linen had been hemmed on the front (outer) edge. Some of these ruffles were folded at the neckline, creating a multi-layer effect. As such, I decided to hem the outer edge of the fretwork veil strips, as well.

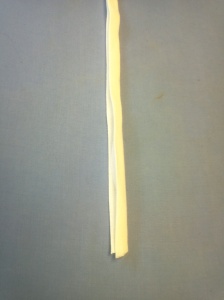
Pins for marking stitch placement.


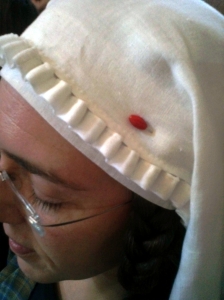
Fretwork attached to veil.


A small portion of the starching sticks in place.


I conducted experiments in starching with both wheat and rice using the original sample fretwork piece that I had constructed. They provided some interesting results.

Due to the yellow/gold discoloration caused by utilizing wheat starch, I opted to starch the fretwork with a rice starch solution.

During my initial experiments in starching a fret strip, I tried pinning the frets open to dry after submerging them into the liquid starch. This process was difficult, did not result in crisp points on the frets, and basically starched small holes into the linen. For my next attempt at starching I made the decision to try using starching sticks. The idea was to fill the fret holes with something that would mold them into the proper shape while drying. Janet Arnold (2008) mentions the use of starching sticks and even displays two of them (reproductions) in Patterns of Fashion 4: The Cut and Construction of Linen Shirts, Smocks, Neckwear, Headwear and Accessories for Men and Women.


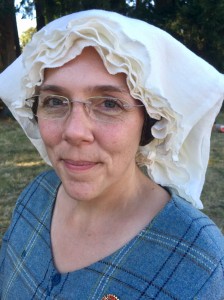
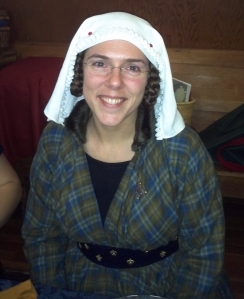
Completed Fretwork Veil
Photo by Gryphon Black

The completed fretwork veil at Kingdom Arts & Sciences.
Photo by Elisabeth Besancon

In the end, I was quite pleased with the results. 🙂

~ Cristiana

Arnold, J. (2008). Patterns of fashion 4: The cut and construction of linen shirts, smocks, neckwear, headwear and accessories for men and women. London: Pan Macmillan Ltd.

Newton, S. & Giza, M. (1983). Frilled edges. Textile History, 14 (2), 141-152.

Scott, M. (1986). A visual history of costume: The fourteenth and fifteenth centuries. London, UK: B. T. Batsford Ltd.

Sturtewagen, I. (Winter 2006/2007). En kruset hoveddug: Catherine de Beauchamps hovedtØj.

Heraldic Sideless Surcoat (part 2)

After whip stitching the first two charges onto the dress, I decided to use a running stitch to attach the third (and final) charge. This meant that one of the patonce crosses was attached with a whip stitch and the other was attached using a running stitch. I wanted to see which would work better covered by the couching cord and which stitch worked better for sewing curves and points. While the running stitch was somewhat quicker, I found that I preferred to sew the whip stitch. To me, it felt like I had better control over the outcome with the whip stitch.

To finish all of the seams, I simply opened them up and sewed each edge flat out in opposite directions. This helped to remove some of the bulk that can form at the seams when two layers of coat-weight wool are sewn together.


The final step in preparing the surcoat to be worn, was to attach the brass plaques. After looking for these for several years, I was finally able to locate them. Because they were square, it was necessary to make certain they were precise and straight. At first I marked the center line on the fabric, but it was still too difficult to make certain the plaques were level to the ground. So instead, I marked the center line with tape and then placed tape at the outer edges of where the plaques should sit in parallel lines to the center line. This allowed me to mark spacing on the top and bottom. It worked well!

Now all that is left is to couch braided cord on the edges of the charges.

I had submitted my Arms for registration before beginning this project, I am pleased to report that they have now officially passed. That’s a relief!  🙂 

~ Cristiana

Bone & Pewter Paternoster

Bone and Pewter Paternoster

From my earliest days in the SCA, I have always loved Paternosters. There is just something beautiful and soothing about the beads; patterns and symmetry… I am always surprised by how under-represented these special items are in the society.

I acquired the bone beads to construct this Paternoster some time ago. This summer, I found the perfect pewter cross while at Pennsic – from none other than Billy & Charlie’s.

This is my new favorite thing.
~ Cristiana

Heraldic Sideless Surcoat (part 1)

For some time now I have wanted to construct a heraldic sideless surcoat made from wool.  Having recently finalized the design and submitted my arms for approval, this seemed like a great time to get started on this project.

I set out to draft a design that would represent my arms, but also work well as an item of clothing. After determining design, I was able to calculate the amount of red and blue wool that I would need for the project. What I didn’t realize at the time, was how difficult it would be to locate the correct colors in the same weight of wool. After purchasing 4 yards of a wool that ultimately would not work for this project, I finally found exactly what I needed at http://www.thewoolconnection.com

The next big decision related to construction. I generally finish hems, cuffs, and necklines by hand, but sew long seams on a machine. My previous exceptions to this guideline have been for ruffled veils, which I have sewn entirely by hand. As I began to work with this wool, cutting out pieces, I recognized that I would enjoy working with this fabric and that it would make a great project to sew entirely by hand.

The next dilemma to be solved involved adding the charges of my heraldic design. I needed to find a source for both white and golden-yellow wool. After significant hunting, it was apparent that finding either of these colors would be extremely difficult. At that point I decided to look for 100% wool felt. I was able to find a really nice dealer on www.etsy.com who sold generously sized wool felt squares in a wide range of beautiful colors.

Once I received the wool felt squares, I taped them to a wall and projected my two heraldic charges onto the fabric. This allowed me to adjust the size of the charges on my document camera and then easily trace the projected shapes onto the wool.

With the garment and charges cut out, I laid them out to begin the pinning process. After measuring and measuring to make certain that everything was straight, I whip-stitched the charges to the garment.

More to come…
~ Cristiana